Table The First: Things I Did and Learned In The Process
|
|
|

|
|
|
Or, "How I'll rebuild the table after it falls down a flight of stairs or off the back of my truck".
- Plywood
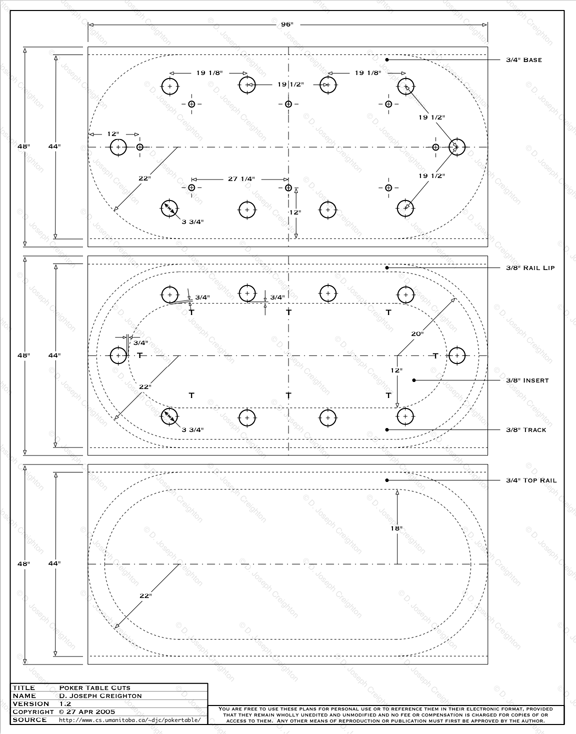
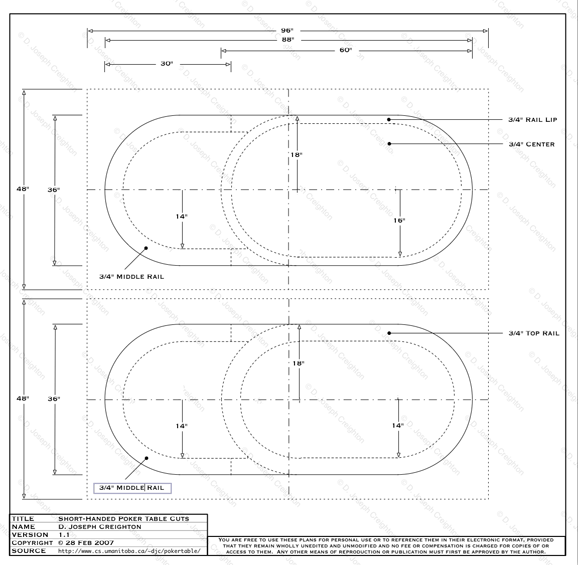
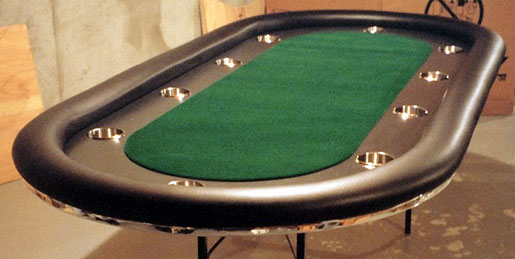
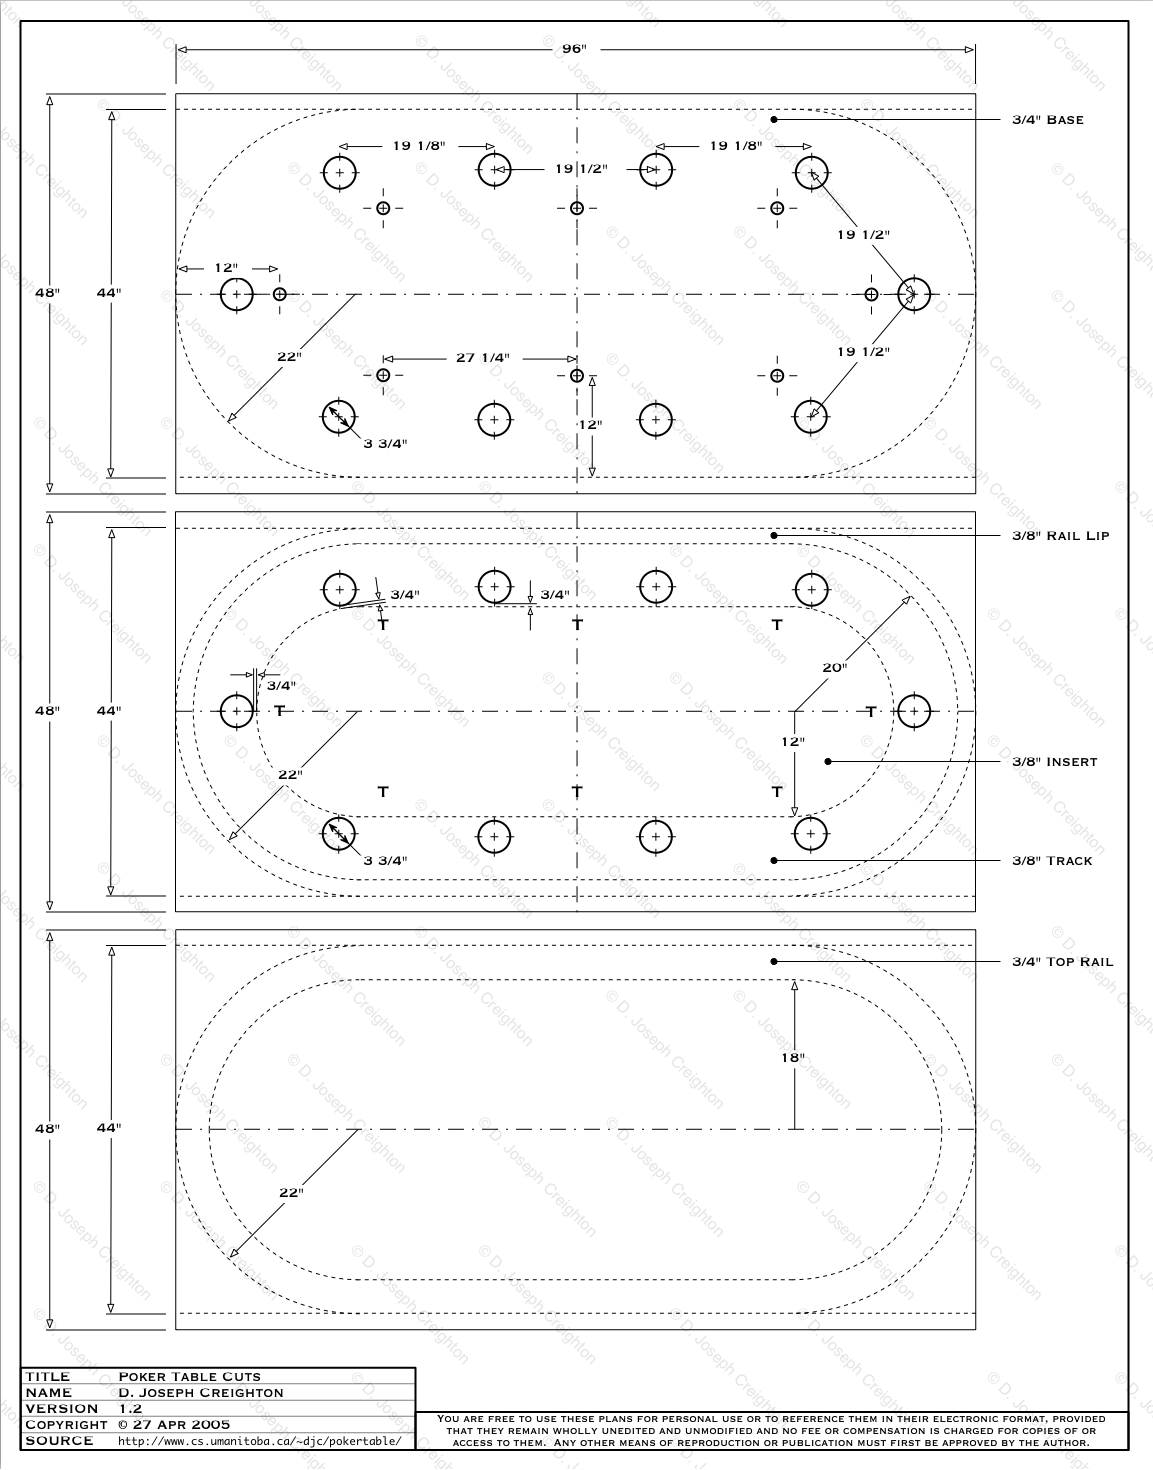
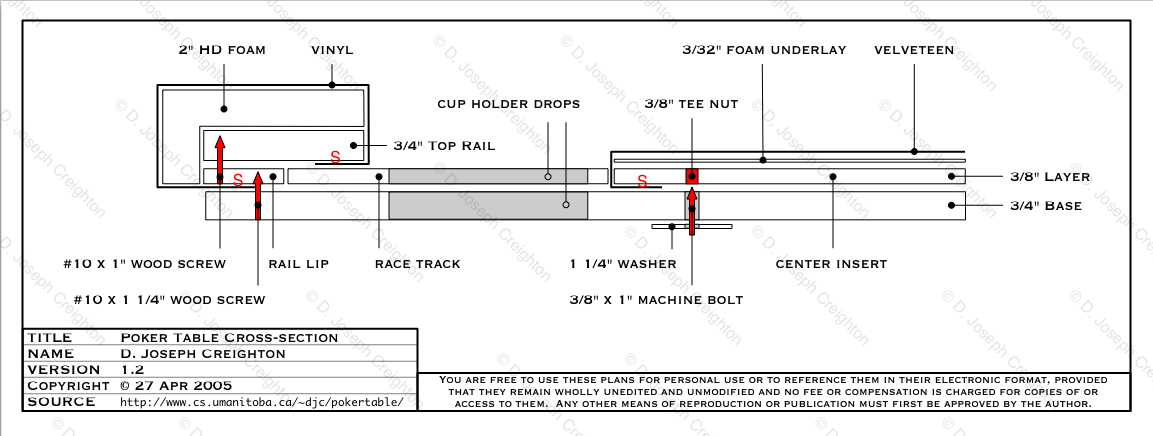
I used three sheets of plywood: 3/4" (base), 3/8" (rail lip, race track and center insert), and 3/4" (top rail). Short of intentionally making the table heavier, I couldn't see a reason to use 3/4" for the race track/center insert. - Arc cuts
Rather than use a string or ruler to measure and trace out the arcs, I used something I'd like to call a flat compass: a piece of steel (approx. 24"x3"x1/8") with a pivot hole drilled in one end and holes drilled across the length at various intervals (usually 1" apart). Just drive a nail into the plywood that is your arc's center point, slip the flat compass' pivot hole over it, drop a pencil into the hole of choice, and drag it around to create your perfect arcs! Naturally, a solid piece of lumber would do just as good a job as this steel thing-a-ma-jig. - Alignment
At one end of your table (makes no matter which), mark an asterick on every piece of wood and on both sides -- but not the good side of your race track! It will save you from having alignment headaches, trust me. - Center line
A center line down each piece can also prove useful. - Base
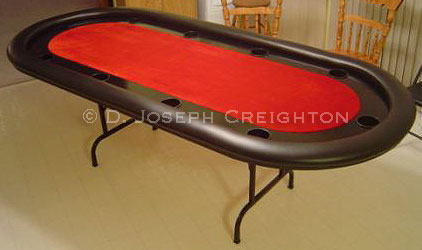
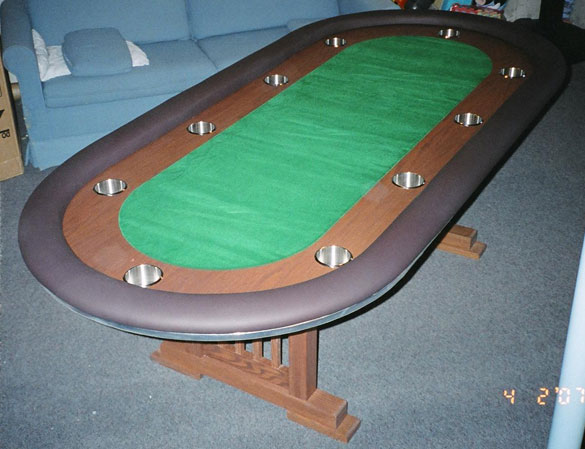
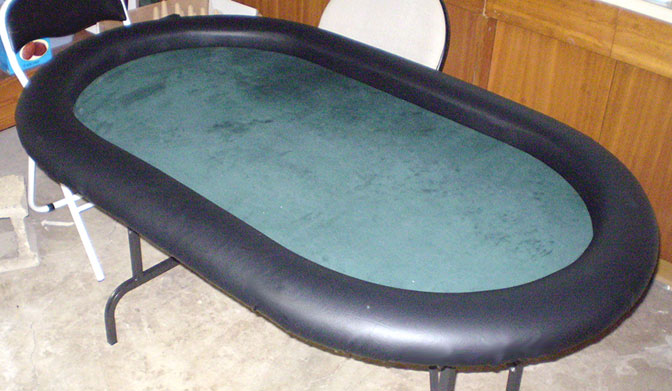
The plywood base was cut to the same width as the outside rail edge so as to cover the staples and wrinkles beneath. It's exposed edge was painted flat black. - Rail cuts
Two saw horses are not enough support when cutting rails: a stress fracture occurred when one rail sagged as a cut was underway but I caught it in time, resupported the rail and the center it was being removed from with extra supports, and finished the cuts. - Race track cut
I didn't want to make a pilot hole in my center insert and was going to do the old 'circular saw drop' trick to get the first, straight edge cuts done but the blade was much thicker than my jig saw blades and I knew I would regret the thickness of the cut later. Instead, I used a drill bit the same thickness as my jig saw bit and drilled a series of pilot holes, side by side along the cut line, until I could get the jig saw blade in. It worked perfectly. - Hiding the gap
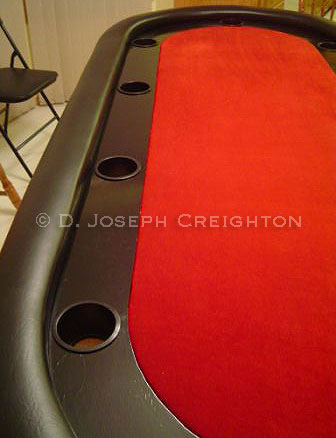
Although it was a great cut, there is still a gap between the race track and the center insert through which you can see the raw wood of the base beneath. To ensure it would not be visible after installing the fabric, I painted this bit of the exposed base flat black. - Foam spray adhesive
When spraying the wood surface for the foam, follow directions and wait several minutes to allow your adhesive to really tack up. If you don't, it won't hold (and it won't improve, either). - Inside rail edge
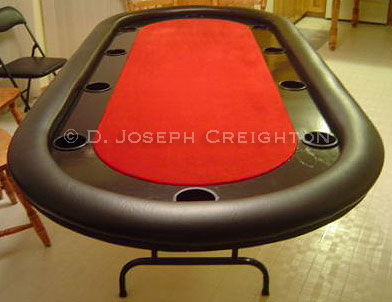
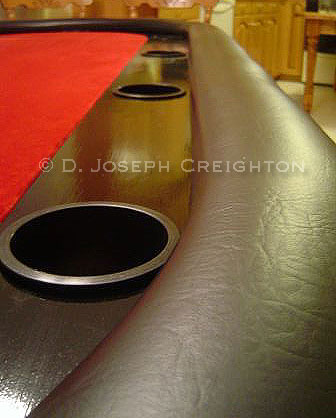
I did not want my rail padding to curve on the inside edge so chips would stack up against the rail nicer: I cut the foam to the edge of the inside wood rail. When compressed, it wrapped ever so slightly around the top edge and looked perfect. - Rail foam and gaps
I used 7'x18"x2" foam for the rail which is not wide enough to do the whole table in one pass. To prevent a visible seam where segments would butt up against each other so I cut the foam at 45 degrees where they were to meet. Seamless. - Vinyl
When installing the vinyl, I had an extra person involved: we each sat on the rail about two or three feet apart to maximize the compression of the foam between sections being stapled. - Stapling
Rather than an electric stapler, I used a manual Arrow tacker gun without any problems; I don't know what kind of girly hands everyone else has that they're complaining so much about it. - A mistake
Measure and test-fit those interior arc cuts on the vinyl: my scissors decided to go that extra bit and I had a single 3mm gap on the inside edge of the rail that I had to repair. This was done by taking a strip of vinyl, cutting it to the height of the rail's inside edge and to a length of approximately 3", and laying it against the rail, wrapping the vinyl over it, and stapling it down. It's virtually invisible. - Druthers
I should have sanded down the race track on all edges, including those that would never be seen: when painting and applying the poly, some of these rougher edges became a nuisance. - Tee nuts
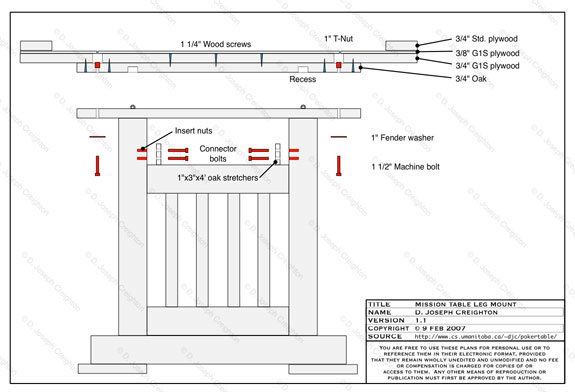
No countersunk holes were required for the Tee Nuts: I merely found a bit that allowed the core of the Tee Nut to pass through then hammered it down firmly until no more progress was made. To aid their insertion, I tapped them once to mark where their teeth were biting, then pulled them out and used a nail to create a pilot hole slightly smaller and half as deep as they were going to seat themselves. Machine bolts from below did indeed tighten them down a bit more and they are nice and flush. - Center insert padding
I did not use 1/4" headliner foam proper but a 50'x48"x3/32" roll of white (clear?) polyethylene foam underlay. It has a bubble wrap feel to it but it's very thin, the cells are very dense, and it's pretty difficult to compress or pop. I like the way it deadens the sound of chips hitting the center -- all you hear is chips and not the wood beneath -- and the ultra low profile keeps it closer to the race track level. My only thought was that I might have put a second layer down (bringing it to a whopping 3/16") but I can always do so later. - Race track finishing
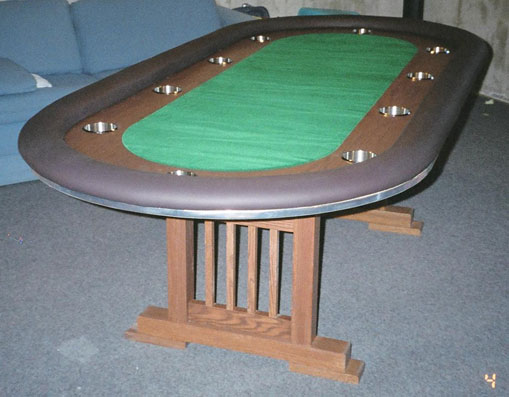
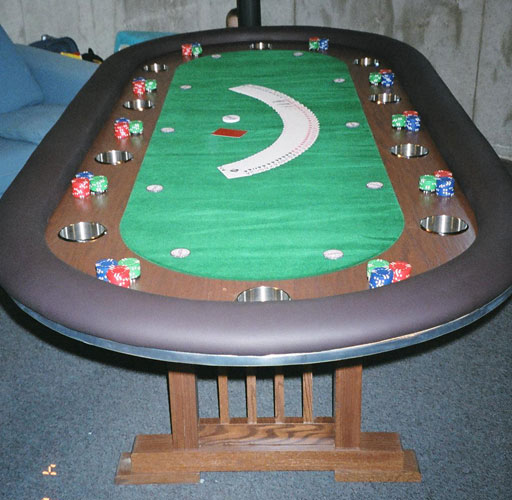
My "good one side" plywood was not very good: it had several places that patches were made to it and filler was applied. Rather than spend the time finding the perfect piece, I decided to paint instead of stain the wood surface: two coats of flat black to act as a base, four very light coats of gloss black, and seven coats of polyeurethane. I did not use a primer on the bare wood because I wanted the grain to show through. Krylon is apparently usable on wood, too. - Cup holder drops
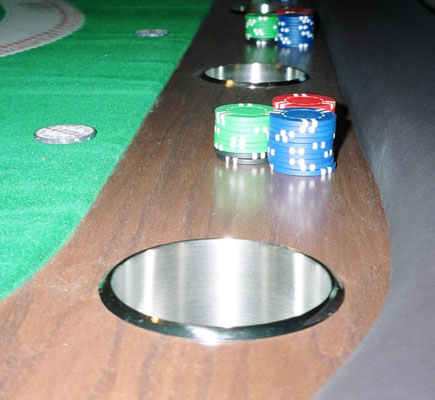
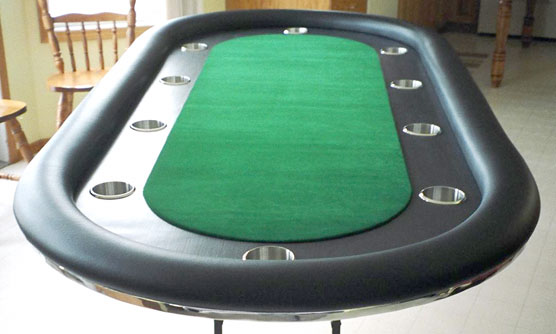
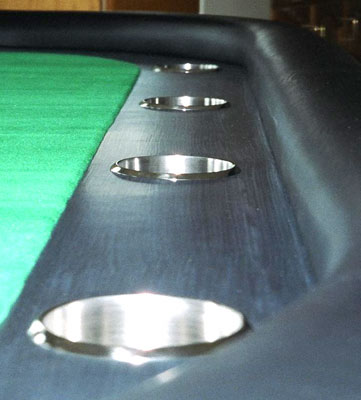
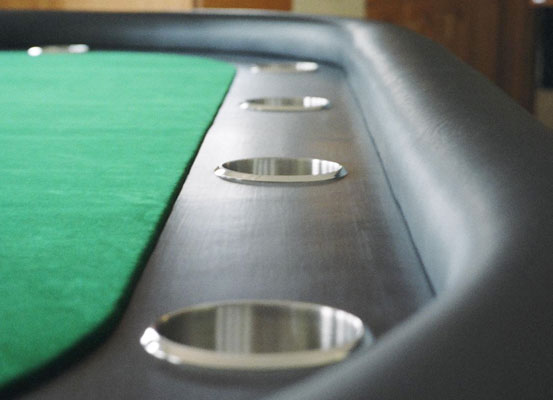
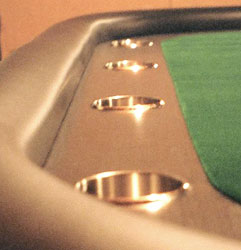
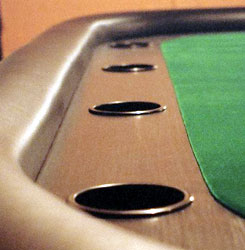
At first, I measured the outside radius of the race track and divided by ten to calculate the cup placement but that seemed really off. When I thought about it, this measure gives everyone equal space at the outside rail but not at the table felt where the action is: those at the ends of the table would have less space. A measure of the inside radius of the race track is probably more accurate. For me, I adjusted that value to get ~19 1/2" on-center, from cup to cup, which puts the four corner drops slightly into the turns. - Cups
The cups were from a marine supply shop and had drains so they could be hooked up to a 3/8" drain line. Since I didn't want condensation or spills to drip on either the floor or the players, I used some raw cork disks from a craft store and cut them to fit the bottom of the cup holders. - Table legs
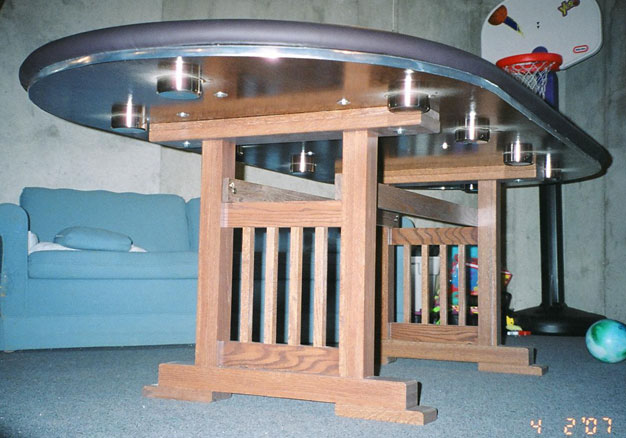
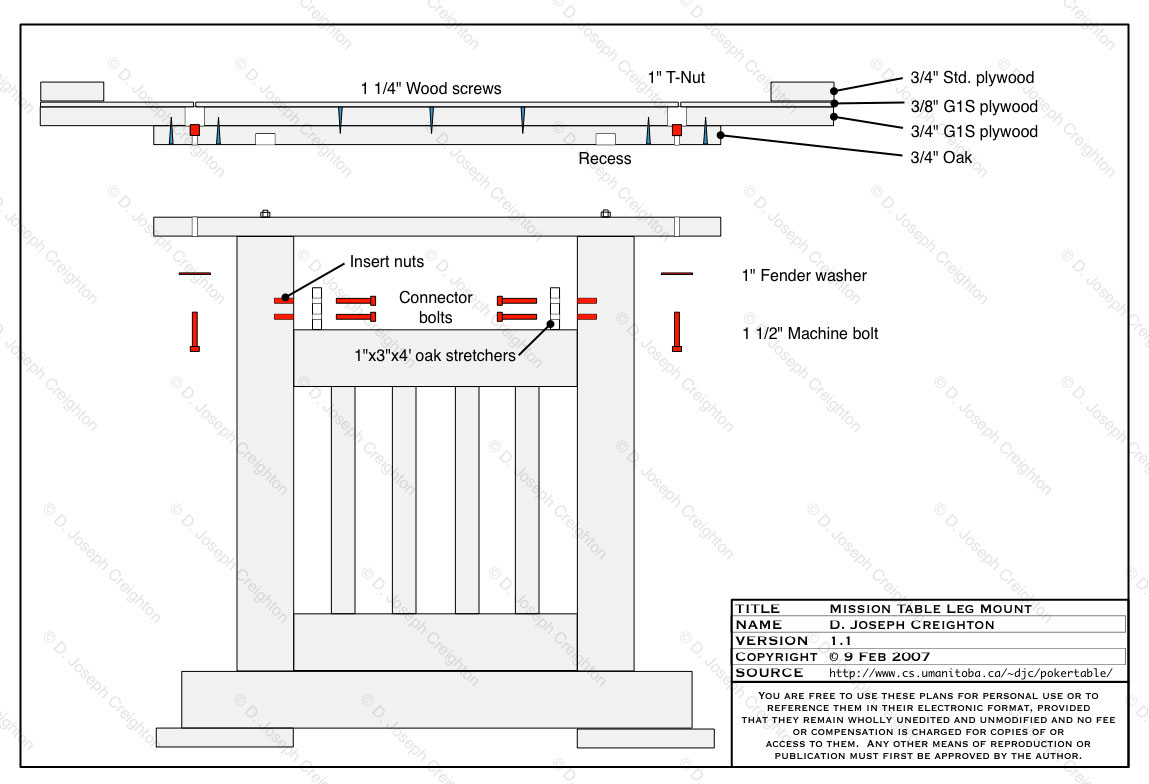
The legs are typical folding banquet table legs, purchased from a big box retail hardware store. Mounting them so that they would be flush when collapsed (footpad-to-footpad) didn't seem right and suggested there would be excess stress in the middle. I decided to overlap the legs by about 6" (warning: yet to be measured), putting the mount points closer to the center of the table and hopefully distributing the load better. - Bringing it all together
I intentionally avoided putting screws through the race track and opted for pinning the track down by going up through the rail lip instead. - The curse
It has been said that one cannot win the first game played on a table they have built. Not only was this the case for me but I was also the first one out of the game. First!I've never gone out first...
On a related side note, this was also the first time I decided to play 72o aggressive on the button early in the game. I drew a few callers right to the river and won the hand when they all folded, but then I flashed the cards to show off. Perhaps the poker gods were simply putting the universe back into balance by forcing me out first.
- Post Script
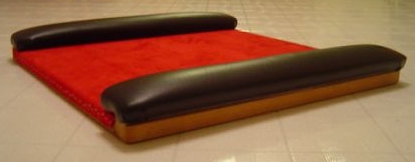
I decided to put my left over materials to good use and build the kids a table of their own. Rather than use plywood of any sort, I dug out a 2'x2' hardwood cutting board countertop that came off an old portable dishwasher (and which I kept because I knew it would be useful "one day"). After building the table proper, it took mere hours to put this together.
Poker Table Cuts
|
|---|
Poker Table Cross-section

|
