Initialize a server in a public cloud
Initialize a server in a public cloud
- Initialize a server in a publicly available cloud computing environment (e.g., AWS).
VMs are pretty cool! Containers are also pretty cool, they enable us to do stuff on our own machine that we couldn’t do before.
Let’s move off of our machine into the cloud.

What even is a cloud?
A visible cluster of water droplets and/or ice particles in the atmosphere. (Weather and meteorology glossary)
That… doesn’t seem like it’s for the right course.
What’s a cloud in the context of computing?
Cloud computing is a model for enabling ubiquitous, convenient, on-demand network access to a shared pool of configurable computing resources (e.g., networks, servers, storage, applications, and services) that can be rapidly provisioned and released with minimal management effort or service provider interaction. (NIST)
… wow, I think the definition of what a literal cloud is was easier to understand.
I think we’ll be able to better understand what cloud computing is in the context of how we got to cloud computing, so let’s take a brief detour define some terms.
A server is a computer. A laptop can be a server, a desktop can be a server, or a rack-mounted computer can be a server.

We usually call a computer a server when that computer is sharing some of its resources (files, access to other networks, applications) over a network.
Not that long ago, the choices you had were limited for running a server on the internet. One was to buy a server, then pay rent to have that server put into a rack in a data center (a building with a very fast internet connection, air conditioning, and support staff). This is expensive if all you want to do is share your personal home page on the internet, but might make sense if you’re running an application that many people use.
Eventually virtual machines appeared, and instead of buying or renting an entire server, companies began to sell or rent virtual machines — a hosting company could buy one large physical rack mounted server and run many virtual machines on that one single machine, then sell access to those virtual machines.
This is appealing because 1) you only have to pay for what you’re actually using, and 2) paying for more CPUs or memory when you need it is trivial compared to buying a new physical server. These companies also created their own suite of web applications and web sites for managing access to these virtual machines, and this is effectively what “the cloud” is: renting virtual machines in someone’s data center.
What cloud are we using?
There are three major cloud providers:
All of these cloud providers have free tiers: either by giving you a certain amount of credit or by specifying kinds of virtual machines with small amounts of resources that are free to use. Unfortunately, though, even though they are free, most require you to provide a credit card for if or when you go beyond what’s being provided for free.
We’re going to be using Microsoft Azure for one specific reason: Students get free access to Azure without needing to provide a credit card; there are no other technical or other reasons for choosing Microsoft over the other cloud providers.
Running your own server in the cloud
With that out of the way, let’s get started on getting a server running on a cloud provider!
Sign up
Sign up for Azure for
Students using your @myumanitoba.ca e-mail address. You
must use your U of M e-mail address because it’s proof that you’re a
current student at the U of M.
Spin up your server
Once you’ve set up your account we can start working on setting up a server.
Begin by going to your main Azure page. There’s a lot going on on this page! We’re looking to set up a new virtual machine. You should see a section labelled “Azure services” near the top of the page:

We want to launch a new virtual machine, so click on “Virtual machines”.
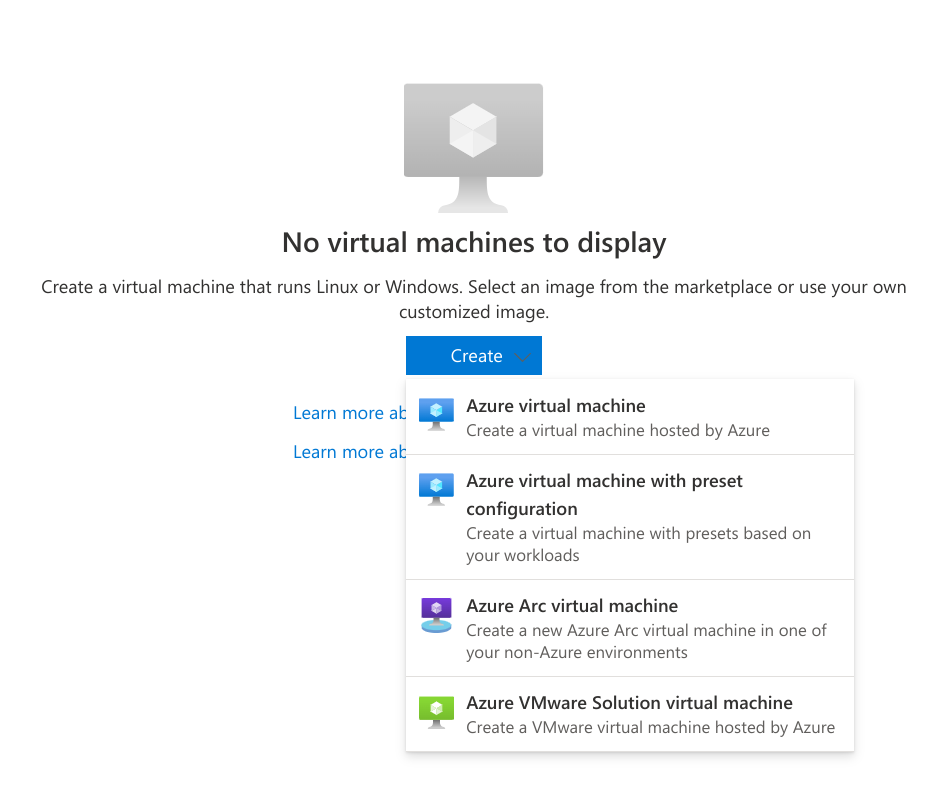
This will take you to a page that has a list of the virtual machines that you currently have running on Azure. You don’t have any yet, so this list will be empty. In the middle of the page should be a button labelled “Create”, click it, then click on “Azure virtual machine”.
Next you’re going to be able to choose options about your new virtual machine. There are a lot of options, but let’s try to take a look at each of them, and suggest some reasonable values you can choose for each.
Subscription: You should only have one choice here (Azure for Students) unless you’ve signed up for Azure before.
Resource Group: When you create a virtual machine on Azure, many different “things” are going to be created that are related to each other, but are reported separately (e.g., the address for your virtual machine is reported separately from the virtual machine itself). You should select “(New) Resource Group”.
Virtual machine name: Give your new virtual machine a name! Naming things is hard. You can name this whatever you want for this exercise, but typically you name virtual machines with their intended purpose (e.g., database, web, app).
Naming things is hard. You’ve actually seen a naming convention already: Aviary. Aviary is not one computer, it’s many computers, and
aviary.cs.umanitoba.cais a “round-robin” DNS entry (remember, it’s a joke; ha ha).You can find a list of lists of naming conventions if you’re looking for inspiration.
Region: This is the approximate location of where the computer running your virtual machine will be physically located. I would recommend that you pick something close to home: “(Canada) Central Canada” (Winnipeg is near the Centre of Canada, but apparently this data centre is actually in or near Toronto).
Availability options: Virtual machines can be running in many locations and not just one. The idea is that if one data centre goes offline, another one will seamlessly pick up your virtual machine and keep it running. Our plan is to bring up the virtual machine so that we can connect to it and that’s about it, so leave this set to “No infrastructure redundancy required”.
Security type: You can choose the kinds of physical security devices that are attached to the computer your virtual machine is running on. We don’t really care about this, but if your app is working with personally identifiable information you might care about this option. For now you should select “Standard”.
Image: This is where you’re picking which operating system is going to be running in your virtual machine. There are both Windows and Linux options. You’re welcome to pick whichever you want, but I would recommend you pick “Ubuntu Server 20.04 LTS - Gen2”.
VM architecture: You can choose what kind of physical processor is going to be used to run your application. Arm64 is effectively the same as Apple’s M1 and M2, or the processor that’s running in your phone. x64 is effectively the same as what’s in most PCs. You must pick “x64” for this option, the free tier that we’re using doesn’t yet have any Arm64 options.
Size: This is where you get to pick how much CPU and memory you want in your virtual machine. We’re not doing much with this virtual machine, so we don’t need to pick anything crazy here. I would recommend that you pick “Standard_B1s”.
Authentication type: Pick “Password”.
Username: Pick a username. This could be the same as your username on Aviary, it can be something else. Pick whatever you would like.
Password and Confirm password: Pick a password.
Public inbound ports and Select inbound ports you can decide what kinds of applications are going to be running on your server. We only want SSH right now, so leave this as the default.
Finally, click on the blue “Review + create” button at the bottom. You can review the details here, then click on the blue “Create” button.
When you click the create button, Azure will slowly create your virtual machine and all of the other resources required to get it running. This shouldn’t take too much time, and you’ll eventually see a message reporting something like “Your deployment is complete”.
Once that message appears, click on the blue “Go to resource” button to see the details of your machine.
There’s a lot, but you’ve just stared a virtual machine in the cloud 🎉!
Connect with SSH
The main thing we’re interested in right now is the virtual machine’s address. Remember: our goal is to connect to our virtual machine with SSH, and the three pieces of information we need to connect to a server with SSH are:
- The address of the server.
- Our username (how we identify ourself).
- Our password (how we prove that we are who we say we are).
You set the username and password yourself when you were setting details for the server.
You can find the address of your server on the right side of the page under the “Networking” heading. You’re going to see a sequence of numbers and not a friendly name (like aviary). This is an IP address. You can use an IP address in the same way as you can a domain name when you’re connecting with SSH:
ssh you@10.10.3.4Connect to your server with SSH!
Shut it down!
OK awesome! You’re welcome to start playing with this virtual machine (it’s just another Linux server, similar to Aviary), but at this point we’re done, we’ve accomplished what we set out to do.
Back in your Azure portal you should click on the Stop button at the top of the page.
Further reading
Initializing a new server feels like just scratching the surface, and it really is. We’ll soon look at managing a Linux installation, but for now we’re going to stop at initializing the server.
If you’re interested in learning more, you should check out some resources provided by the different cloud providers:
- Microsoft’s Training for Azure has many high quality and structured tutorials for working with virtual machines in Azure.
- Amazon’s AWS SkillBuilder similarly has high quality and structured tutorials for working with AWS.
- Google’s Cloud Documentation … similarly has high quality and structured tutorials for working with Google Cloud.